Plan with precision. Build with confidence.
Measure the room, choose a pattern and get an exact working drawing showing every cut. Calculate everything from hardwood, laminate, tile and herringbone on floors, to panelling, plasterboard and suspended ceilings.
Draw and plan one room for free. Unlock a Single or Renovation Pass to get exact measurements and cut lists.
Flawless floors and ceilings, calculated instantly.
The real screens, straight from the app: the plan, the ceiling, the cut list and the sheet you print.
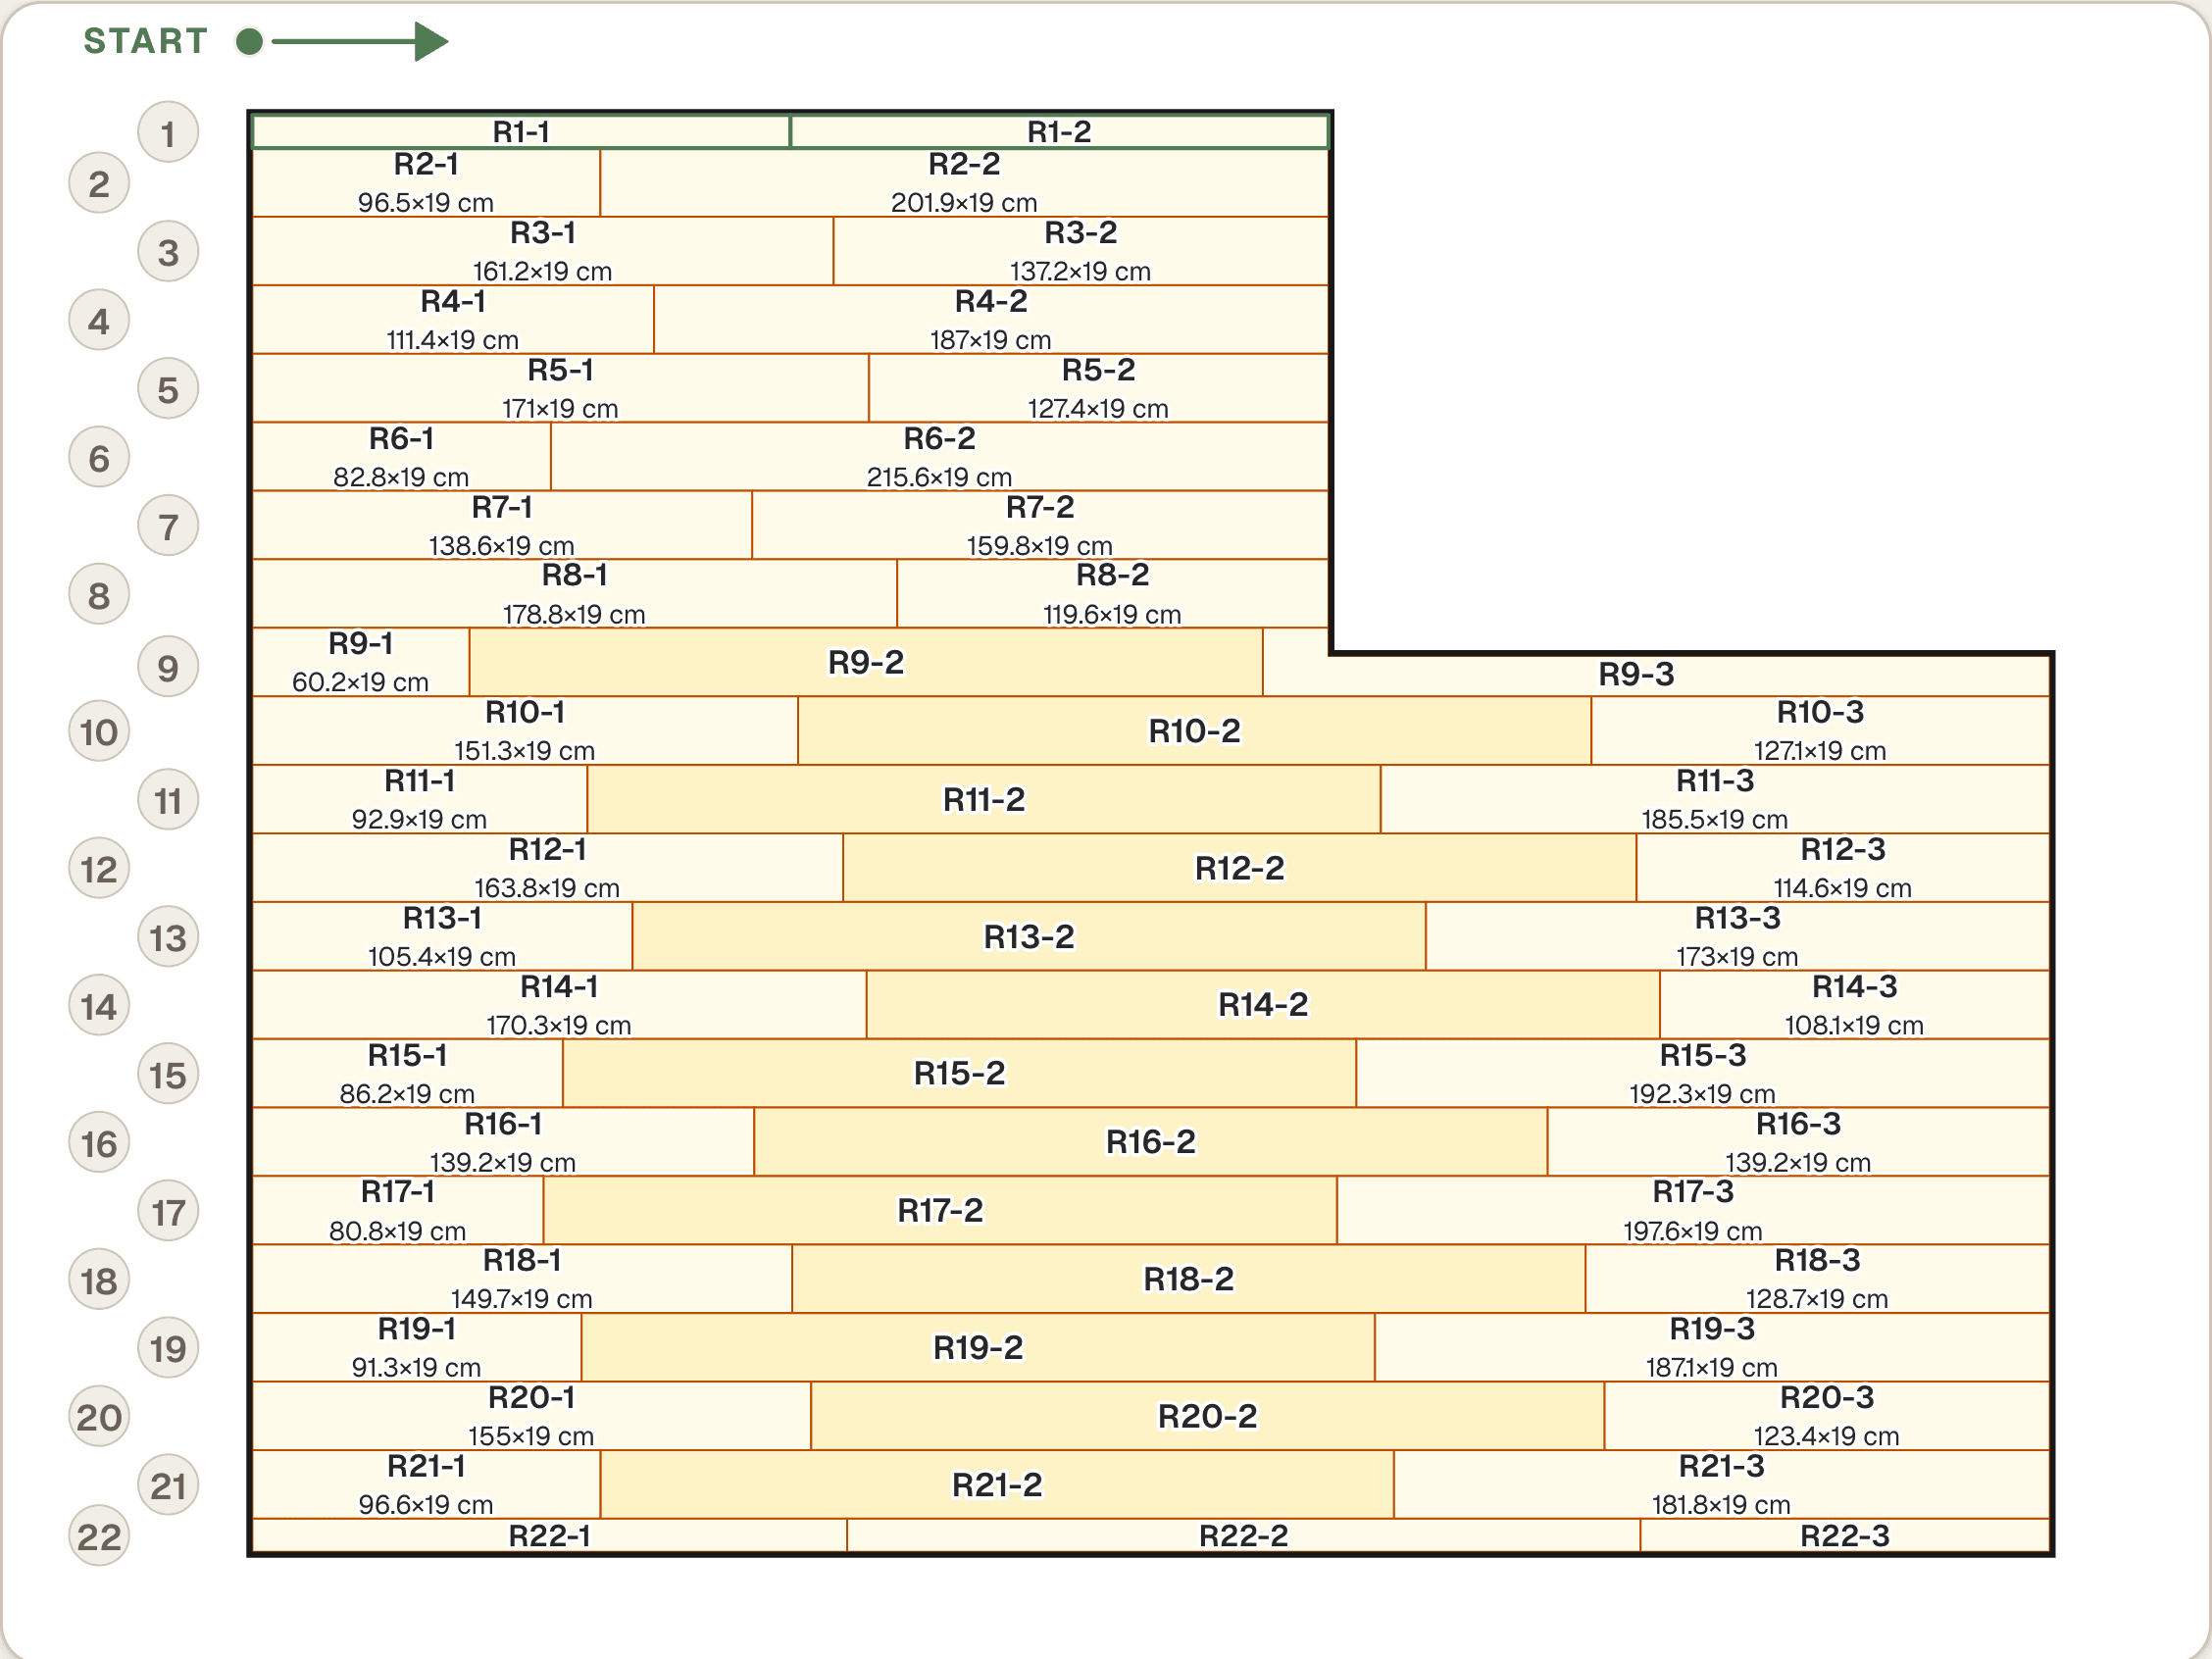
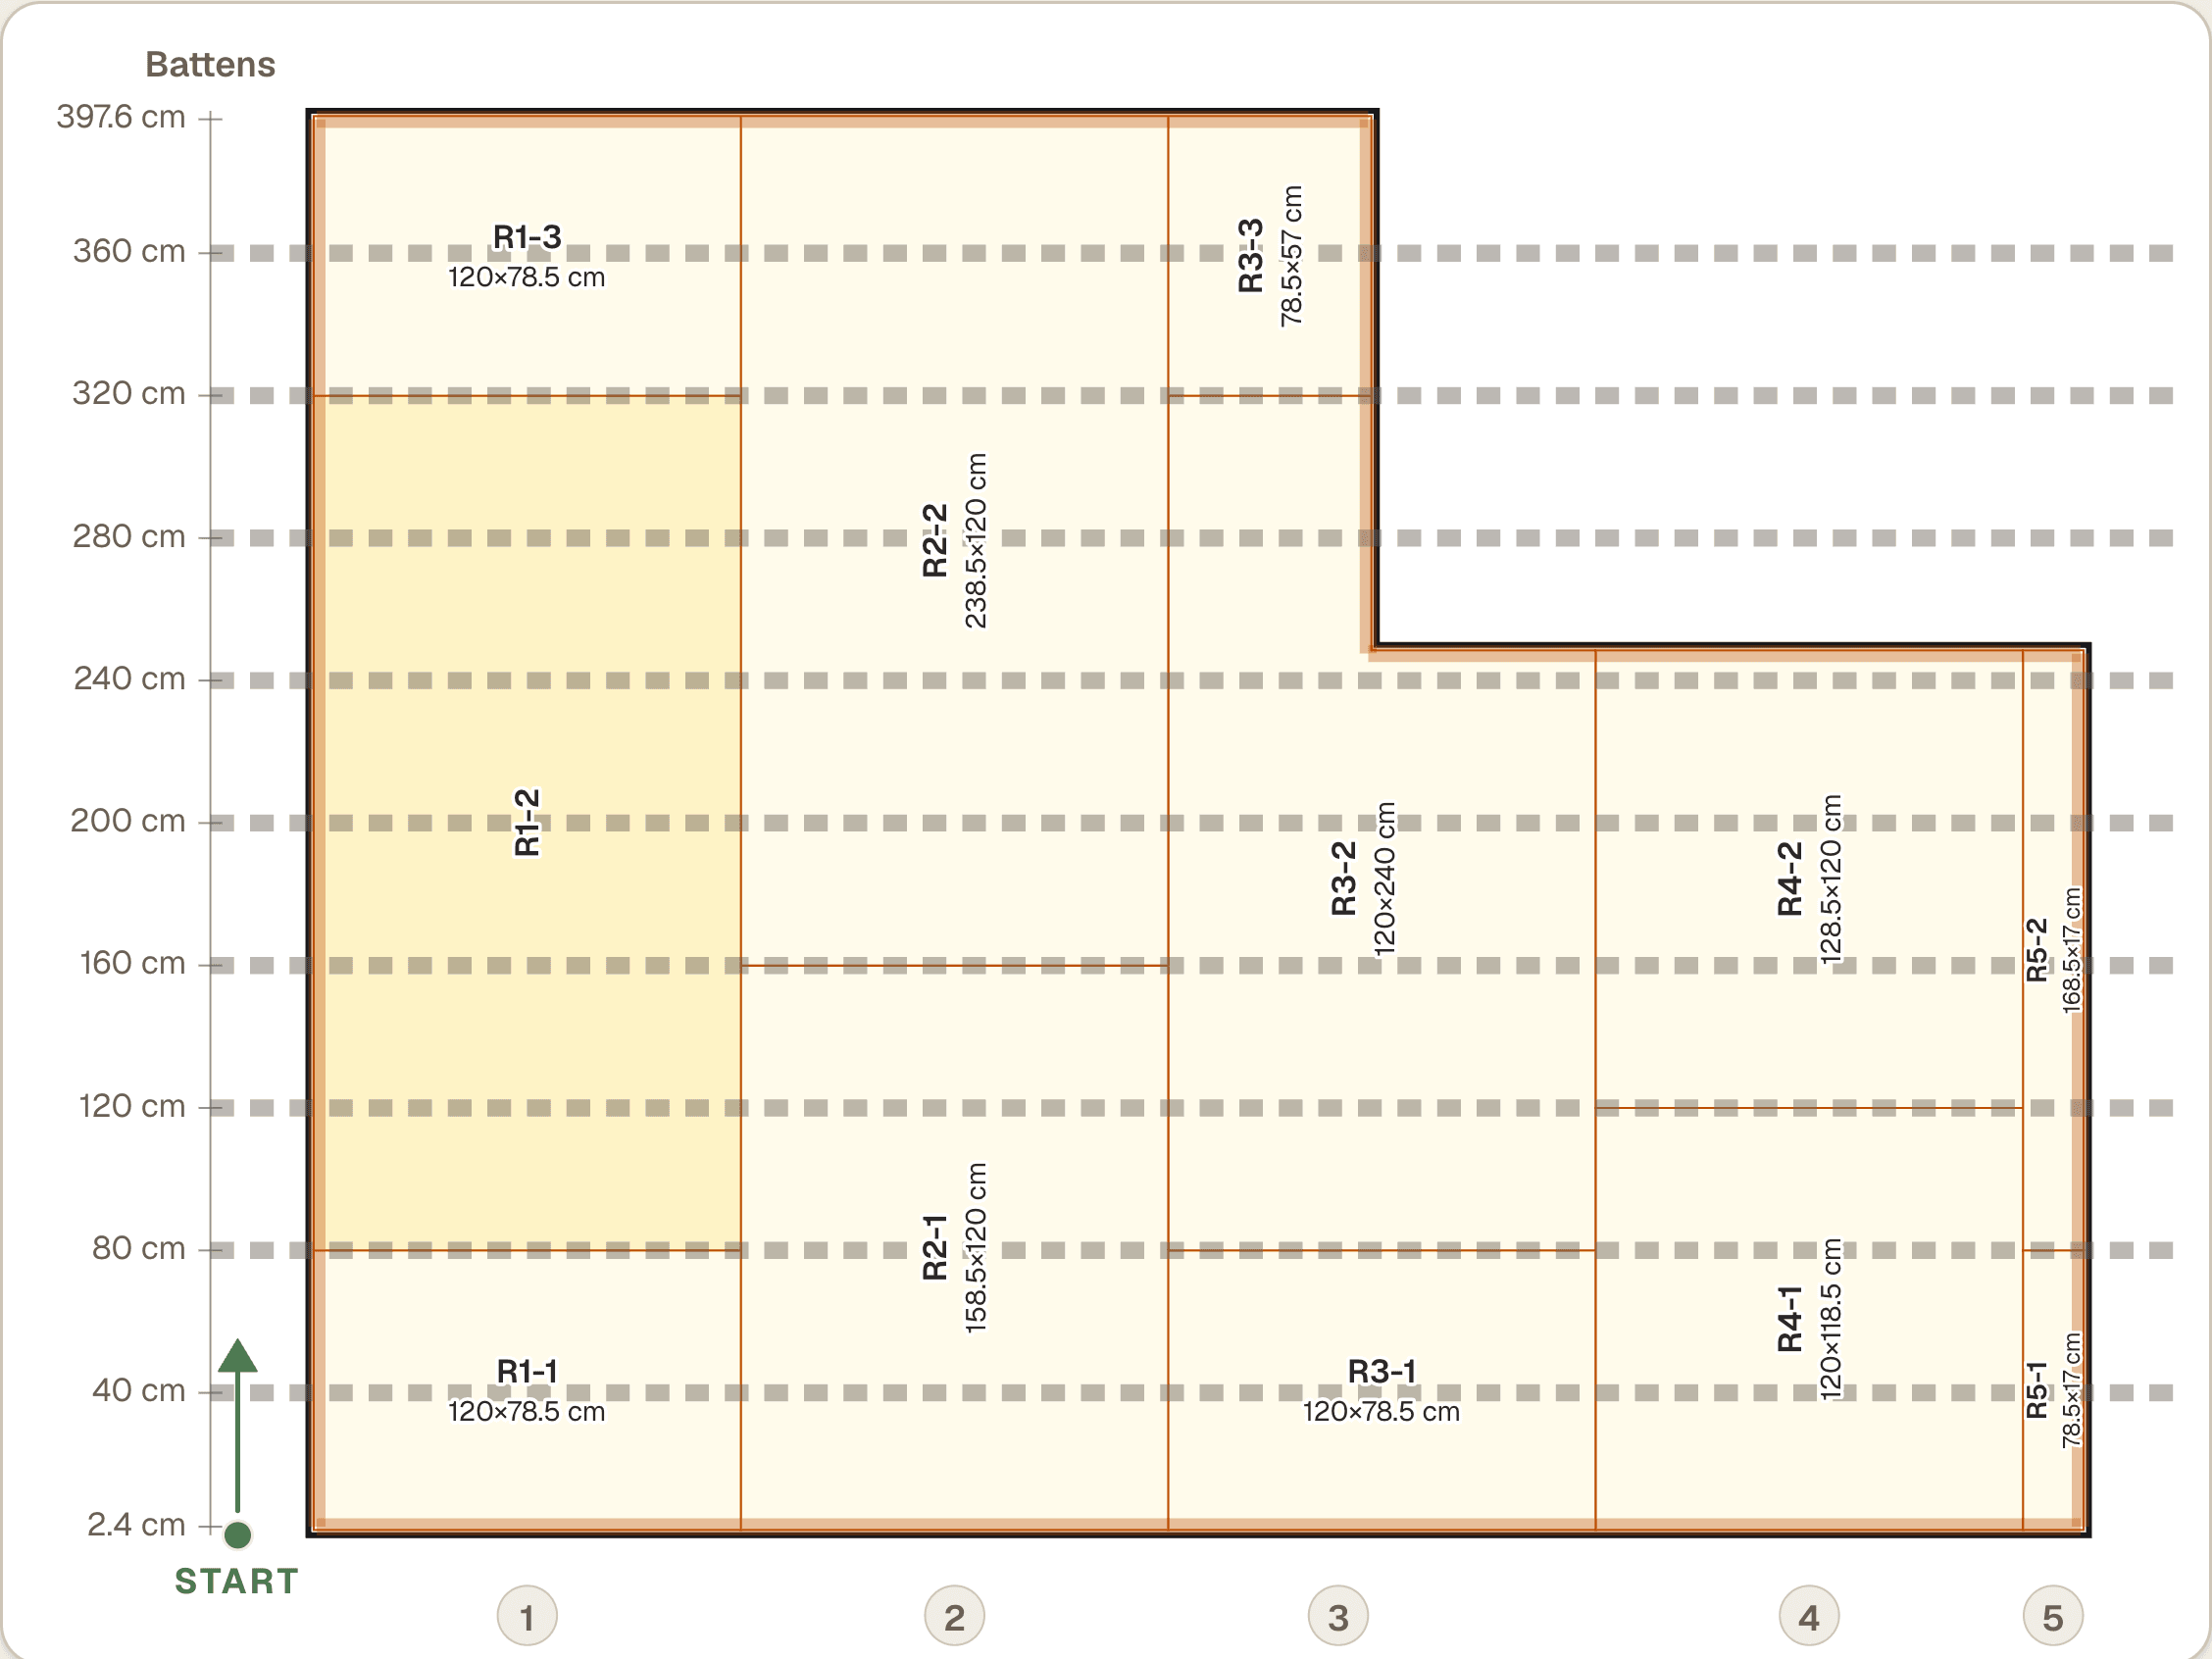
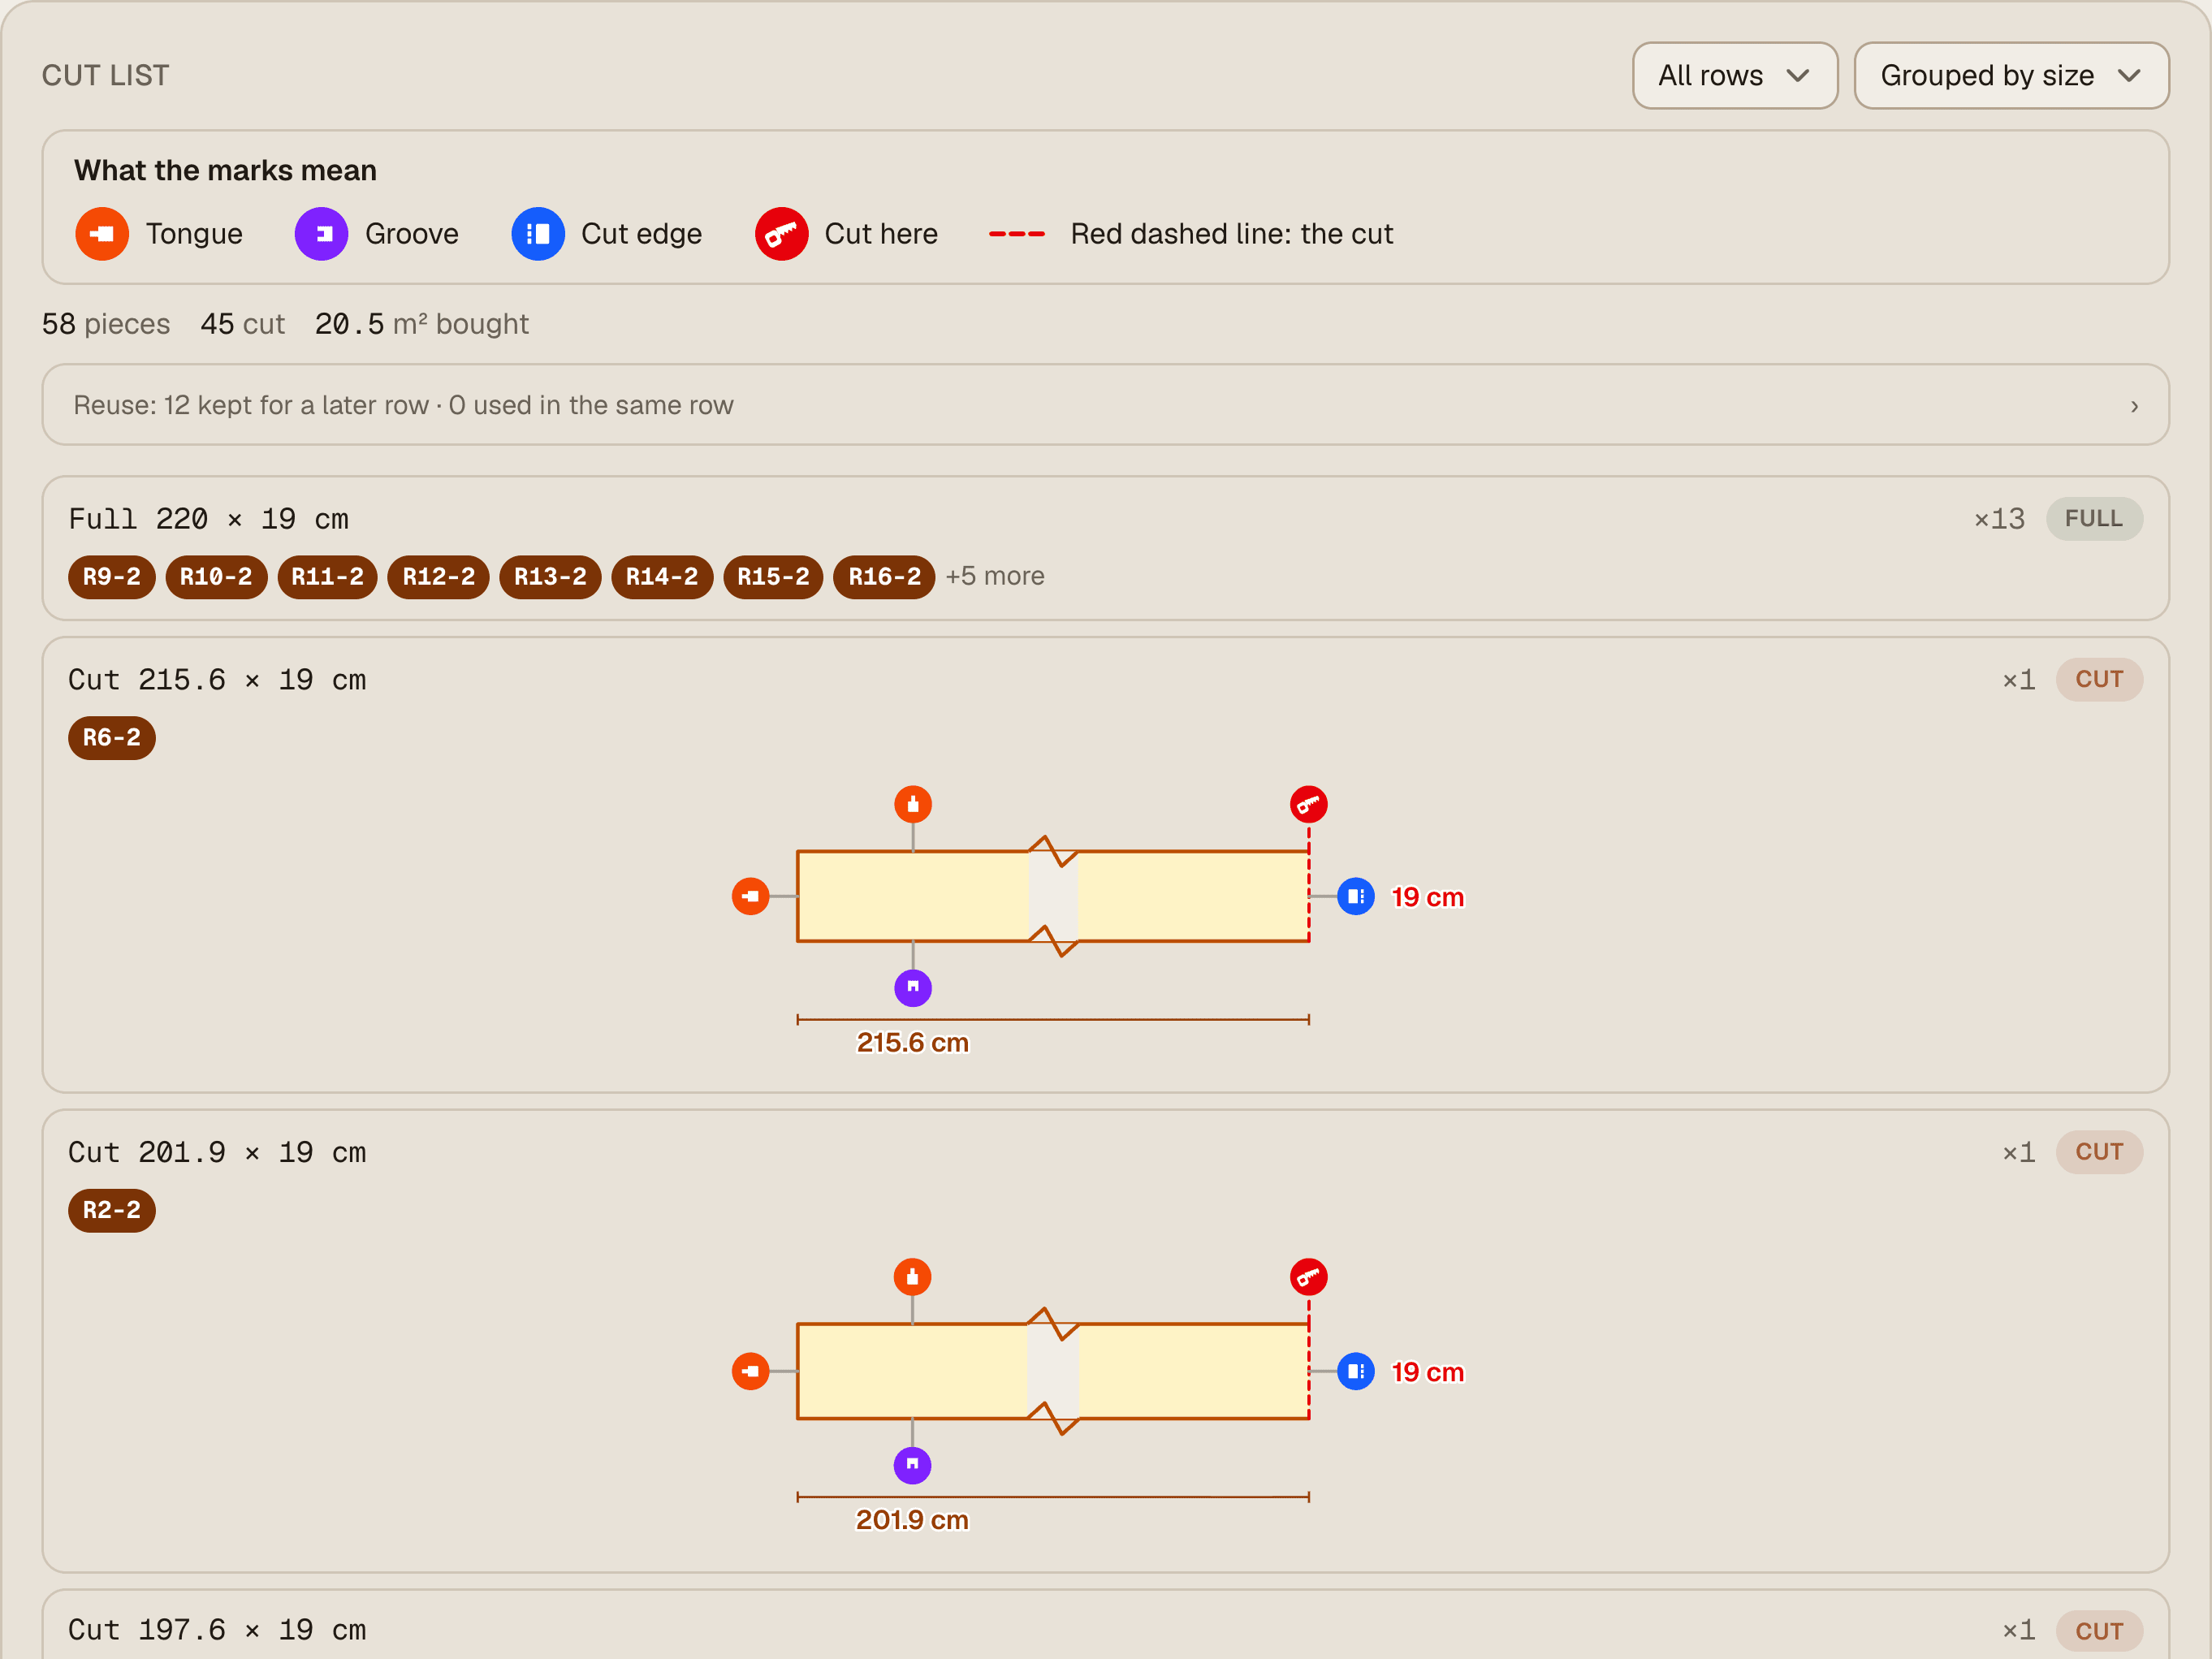
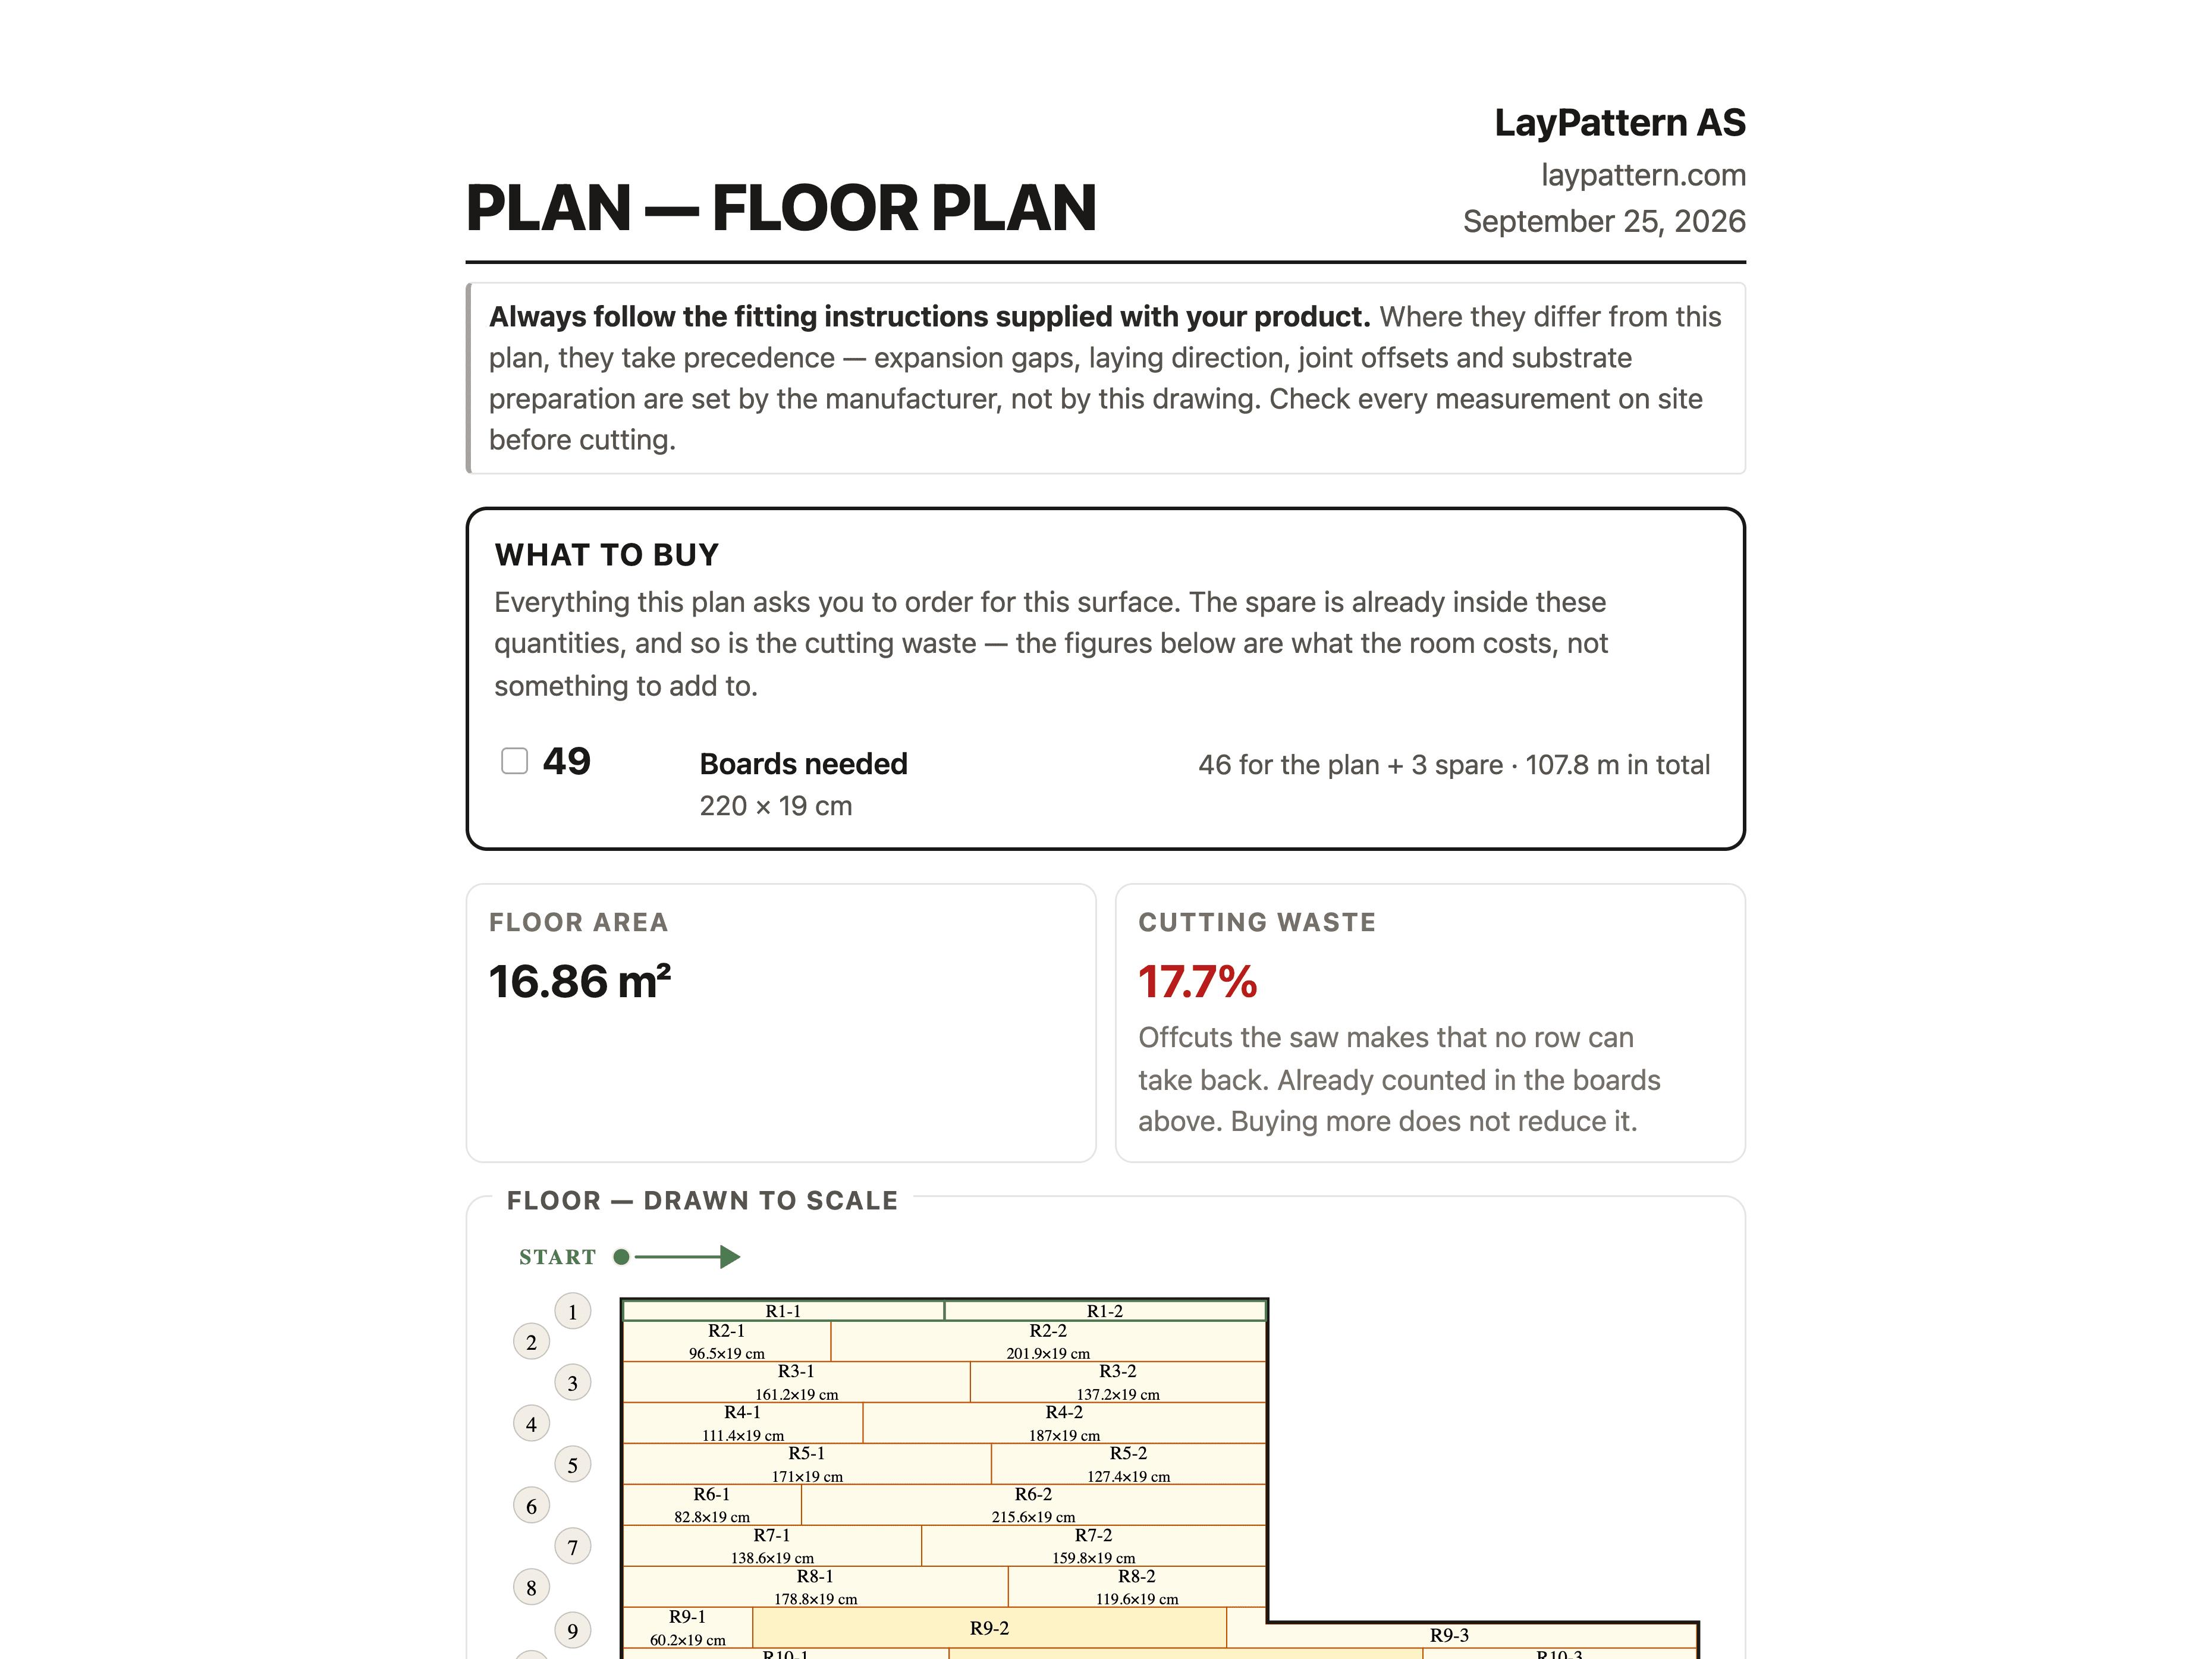
Every piece, numbered and measured
The room drawn to scale with each board identified, its size on it, and the start point and laying direction marked.
Ceilings are not floors you look up at.
A ceiling’s layout is dictated by the materials and the structure behind it. LayPattern accounts for these differences and plans the substructure accordingly.
Drywall, ceiling boards, panelling, and suspended ceilings.
Batten spacing that follows the panels and their direction, ensuring all joints land dead center on the timber.
Each point is measured from the walls and marked directly on the intersecting board or panel. This allows you to cut and drill holes before the piece is installed.
Perfect patterns. Zero guesswork.
Every pattern follows real installation rules: joint stagger, minimum end pieces, centered set-out and mitered angles.
Plan, pattern, cut list.
Map your room
Pick a rectangle, L- or U-shape and type your measurements, or draw any outline to scale. Metric and imperial both work.
Add a surface
A floor, a ceiling, or both. Each keeps its own pattern, cut list and price, and a ceiling brings the timber behind it: batten centres, board direction, or a suspended grid.
Lay it out
Six patterns with real set-out controls: joint stagger, minimum end pieces, centred lay, rotation, offset, no-cover zones, and a bench that saves offcuts and lays them again instead of buying another board. On a ceiling, set out downlights, outlets and vents too.
Get the plan
A to-scale diagram with numbered pieces, an exact cut list, material counts, waste percentage and a cost estimate, plus every hole measured on the board it goes in.
Know exactly what to buy, before you buy it.
Forget rules of thumb. LayPattern calculates everything upfront, so you know exactly how many packs you need, what the waste will be, and your total cost. Just like the pros do it.
Square meters are translated directly into the actual packs the supplier sells. The purchase is automatically optimized, ensuring you never pay for more materials than strictly necessary.
Forget “ten per cent extra just in case.” Waste is calculated based on actual cuts, where all offcuts are immediately reused wherever they fit the pattern.
The shopping list, cut list, and drawing are all connected. Change the layout pattern with one click, and the entire calculation updates in an instant.
Enter the measurements from the pack (dimensions, coverage, and price), and the rest is calculated automatically. Supports both metric and imperial.
Free to try. Buy a pass for full access.
- 1 saved project
- Live preview of all patterns
- Visual sketch of floors
- Locked: dimensions, cut lists, materials & PDF exports
- 1 room unlocked for 7 days
- Full cut list, exact measurements & materials
- Export PDF plans for the job site
- Need more time? Add 7 days for
- Add-on: Electrical & Fixtures for
- The room is not deleted when access expires. You can unlock it again anytime to continue editing.
- Up to 7 rooms unlocked for 30 days
- Full cut list, exact measurements & materials
- Export PDF plans for the job site
- Need more? Add 3 extra rooms for , up to 10 in all
- Need longer? Start a new pass once the 30 days are up
- Add-on: Electrical & Fixtures for
- Nothing disappears when your pass expires. With a new pass, you can open the rooms and make changes again.
- Unlimited rooms & projects, no extra passes required
- White-label PDF exports (your logo, not ours)
- Team dashboard to invite & manage your crew
- Advanced ceiling set-out (batten centres & joints)
- Electrical & Fixtures included for all projects
Deliver complete, branded plans to your clients and win the next bid.
Choose ProSingle and Renovation Pass unlocks are one-off, no subscription · Pro is billed per seat, cancel any time
Fetching current prices…
Good to know before you start.
How do I lay a floor?
Measure the room, choose the direction (usually with the light) and start at a wall. The tongue facing the wall is cut off, and a floating floor needs an expansion gap all round. Choose the bond — a fixed ½, ⅓ or ¼ offset, or continuous with a minimum overlap — and centre the pattern, so the first and last rows are ripped to the same width. LayPattern plans the whole floor: every board numbered, every cut measured, and every offcut coded with where it is used again.
How do I work out how much flooring or tile I need?
Measure the floor area, splitting an L-shaped room into rectangles, and add waste: 5–10% for a straight lay, 10–15% for herringbone or a diagonal lay, where every border piece is cut at an angle. Divide by what one pack covers and round up. LayPattern calculates instead of guessing: it lays every board or tile in your room, reuses offcuts where they fit, and gives you the packs and the waste before you buy.
Which way should the flooring run?
Usually in the direction of the light, with the boards pointing towards the main window, so the long joints between them barely show. Running them along the longest wall often means fewer cuts. Boards nailed straight to the joists have to run across them. In LayPattern you turn the layout with one click and see how the cut list and the packs change.
How far apart should the end joints be in laminate and parquet?
Your product’s fitting instructions decide. They typically ask for 30–50 cm between the end joints of neighbouring rows, and a minimum length for the piece at each end of a row. Enter both in LayPattern and every row is kept to them. Where a room can’t meet them everywhere, it tells you which rows and why, before you cut.
Where do I start laying a herringbone floor?
Glued or nailed herringbone starts from a centre line down the room, so the pattern is symmetrical and the cuts at opposite walls come out the same. Click herringbone can’t be laid from the middle: join a few rows into a “starter raft”, saw its back edge straight and push it against the starting wall with its point on the centre line. LayPattern marks the spot, numbers every piece, and counts the A and B boards separately, since they are ordered separately.
Where should I start tiling a floor?
In most rooms, in the middle, so the cut tiles at opposite walls come out the same width. If that leaves a thin sliver at the walls, shift the grid by half a tile. LayPattern centres the tiles, allowing for the grout joint, lets you nudge them, and draws every cut tile with its measurements.
How do I put up a ceiling?
Start with the system: plasterboard, ceiling boards such as Takess, wood or MDF panel, or a suspended grid. The system decides the batten spacing, which way the boards run, and where the joints have to land: on a batten, or between battens where the tongue and groove carries them. Mark the lights and vents before a board goes up. LayPattern sets out the battens, lays the boards and marks every hole on the board it falls in.
How far apart should ceiling battens be?
It depends on the board and which way it runs, and the product’s instructions have the last word. Plasterboard across the battens: 400 mm centres at most, or 600 mm with 15 mm board or two layers. Wood and MDF panel: 300–600 mm, with the end joints on a batten. 600×1200 tongue-and-groove ceiling boards along the battens: exactly 600 mm, so every long edge can be fixed. LayPattern sets out every batten to suit, so each joint lands where it should.
How do I put up tongue-and-groove ceiling boards?
Boards like Takess (600×1200, tongue and groove on all four edges) usually run along the battens at 600 mm centres, so every long edge lands on a batten and is fixed out of sight through the groove; the tongue and groove carries the short ends. Across the battens they need 300 mm centres. Lay them in a half-board bond from the corner the profile dictates. LayPattern centres the boards in the room, shows the starting corner and sets out the battens.
Measure and plan first. Cut once.
Turn a room and a pattern into a precise cut list in minutes.